Connecting to google CloudSQL using cloudsqlproxy and IAM
Hi!
In this guide we’ll walk through every step necessary to connect to a Cloud SQL instance using the Cloud SQL Proxy with IAM database authentication.
I decided to write this after migrating users from native MySQL authentication to IAM and discovering there were no clear, straight‑to‑the‑point guides available. Let’s begin.
Prerequisites
Make sure you have:
- The gcloud SDK installed
- A Google Cloud project with billing enabled
- A Cloud SQL (MySQL) instance created
- Your IAM identity has the following roles:
roles/cloudsql.client(Cloud SQL Client)roles/cloudsql.viewer(Cloud SQL Instance Viewer)roles/cloudsql.instanceUser(Cloud SQL Instance User)
- The Cloud SQL Auth Proxy installed (see below)
- The MySQL client (
mysqlCLI) installed
Enable IAM Database Authentication on Cloud SQL
- Open the Google Cloud Console.
- Navigate to Cloud SQL → Instances → <your‑instance>.
- Switch to the Users tab and click Add user account.
- Select IAM database authentication (instead of a password).
- Add your Google account (or service account) as a Cloud SQL IAM user.
Installation
If you haven’t already, install the gcloud SDK.
Install the Cloud SQL Proxy
You can always follow the official docs, but here’s the condensed version.
Linux
curl -o cloud-sql-proxy https://storage.googleapis.com/cloud-sql-connectors/cloud-sql-proxy/v2.15.2/cloud-sql-proxy.linux.amd64
chmod +x cloud-sql-proxy
sudo mv cloud-sql-proxy /usr/local/bin
macOS
brew install --cask google-cloud-sdk
brew install cloud-sql-proxy
Authentication
Log in with the gcloud SDK to simplify authentication:
gcloud auth application-default login
(Optional) set your default project:
gcloud config set project <PROJECT_ID>
Start the proxy
Grab the instance connection name (format: project:region:instance) from the instance Overview page, then run:
cloud-sql-proxy --auto-iam-authn --port 3306 project:region:instance
--auto-iam-authn turns on IAM database authentication.
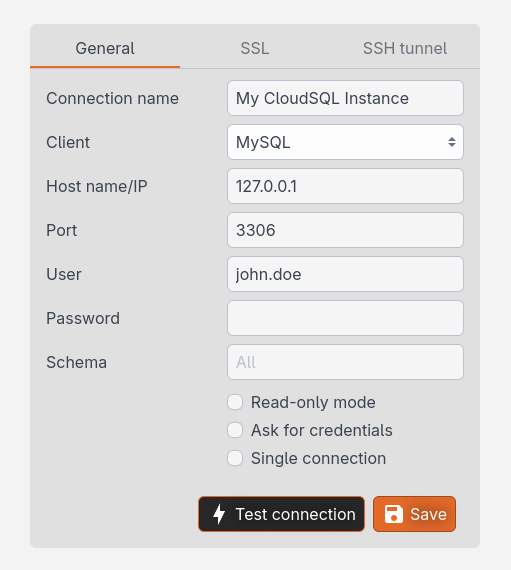
Connect with your client
- Username → first part of your Google Workspace email (e.g.
john.doeforjohn.doe@mycompany.com) - Password → leave blank
- Host →
localhost(or127.0.0.1) - Port →
3306
Tips
- GUI clients like Antares SQL or DBeaver make life easier.